As explained in the previous page at the beginning in the section about
the diskmedia the formatted disk is divided into 16 sectors. And
at this
point iŽll just remind to the fact that i explained - the timing of the
disk-controller is determined by the software in the prom on the
conmtroller-
card. The result from this two facts - is that the speed of the DISK II
drive is upmost important for the correct operation.
To explain this as simple as possible - i Žll do the explenation with three
pictures below assuming that the time
is given ( i.e. fixed ) by the timing
of the controller and the computer in each picture
is the same ( calculated by this math: 300 turns per
minute => 5 turns per second =>
1 turn = 0,2 part of a second or 200 milliseconds )
and to simplify the examination iŽll
drop off from the interleave and just give the sectors a simple descending
order... :
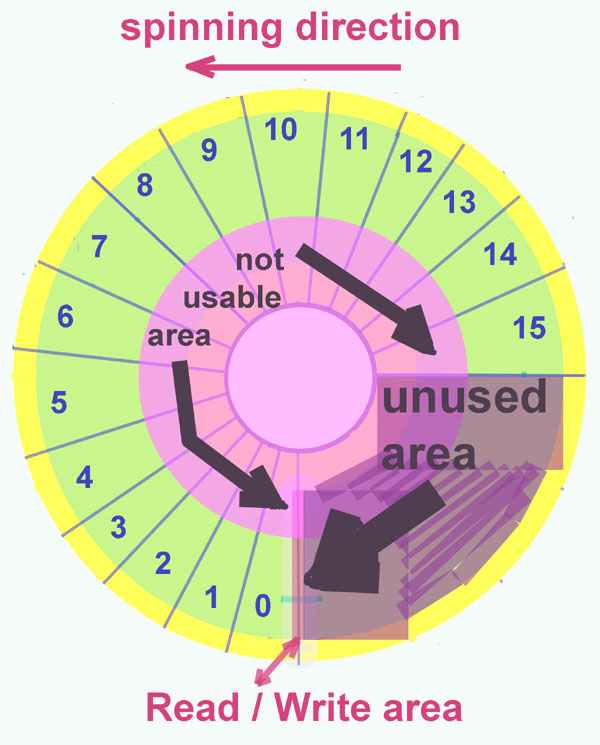
Drivespeed
to slow
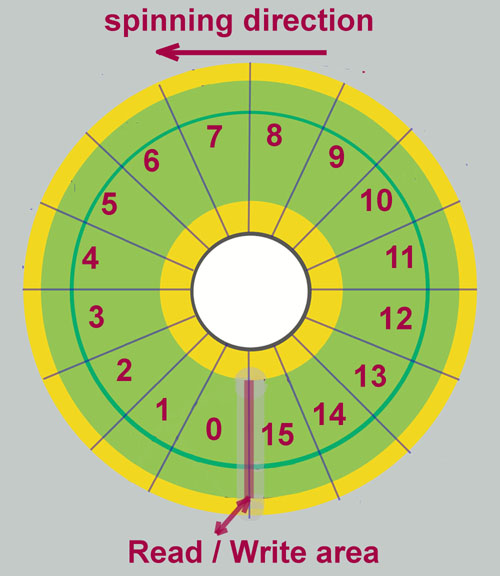
Drivespeed correct
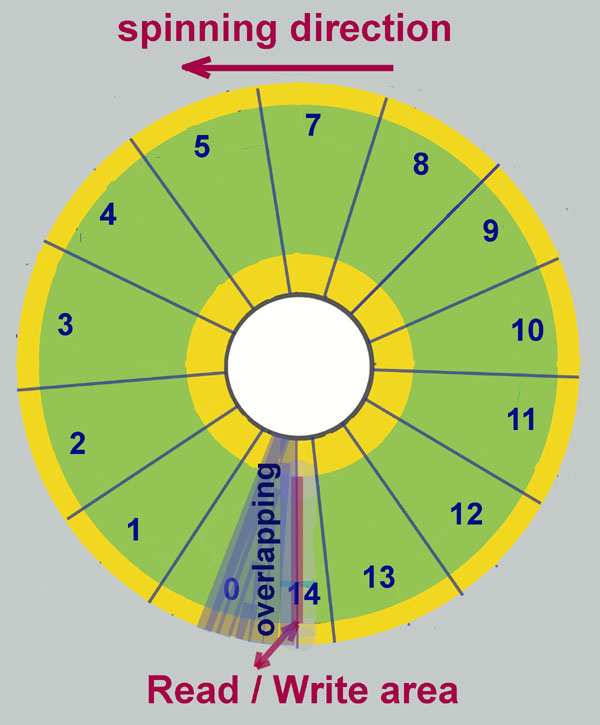
Drivespeed to fast
If drivespeed is too low, less
distance of
material passes the read/write-head and therefor the
sector becomes shorter ( i.e. smaller ) leaving a
remaining part of the disk unused..... that seems at
first sight not bad.... but in
fact it is really bad because the amount of bytes
to be written are pressed in a smaller amount of space
and due to the attitude of the magnetic-coating
that material starts to fail...
this occurs the less and the shorter the path of reading or
writing is - the circles towards the middle ( i.e. the
tracks from track 21 or 22 upwards will contain the more
mistakes each step further towards the middle of the
circle). This area is indicated by the violet color in
the drawing above...
So if the speed is correct - the 16 sectors
will fit correct in the given space and just
also at the inner circles ( tracks above 21 or
22 the length of the line is just long enough
to bear the amount of bytes written to the
track..... ( more about that topic later at the
page about compensation )
If the drivespeed is too fast - the path written to or
read from the disk becomes longer, because the turn
brings larger part of the disk passing the
read/write-head.... but in fact it leads to the mistake
-
that a part of the previous sector is deleted and
overwritten by the new content of the following sector (
bear in mind
the interleave
explained in the previous page !)
- this is indicated in the simple drawing above by the
fact, that sector 14 wonŽt
fit anymore in the given remaining space and starts to
overlap the sector 0 and if
you try to imagine where sector 15
is (?) - i dropped it, to keep the drawing simple
... otherwise it would overlap the rest of sector
0 and large part of sector
1 !
In truth of course the real thing is, that every sector
written to disk will overlap previously data written to
disk in another previous sector
(i.e. deleted and written with new content about 5% to 25% or even more )
depending to the percentage how much the speed of the
drive is too fast....
So after this examination everybody will understand that wrong diskspeed
is harming your data same bad as a dirty read/write head and
most of
you will probably determine to spend your drives some kind of
"wellness"-treatment at least once or twice a year, depending to
the area the
solve their duty.... the harder the circumstances the more some treatment
will be needed to keep the equipment in good shape....
The task to adjust the speed of the drive is rather easy and there are
two basic ways to perform the task:
You can do this in a general and simple way without software if you donŽt
have any and if you want to get at least "some kind" of
adjustment.
It will permit you to adjust the drive at least within a limitation of
about +/- 4% to 5 %.
The second option doing the task with software is with more comfort and
it permits you an adjustment within a nearly perfect boundary of
less than +/- 0,2 % !
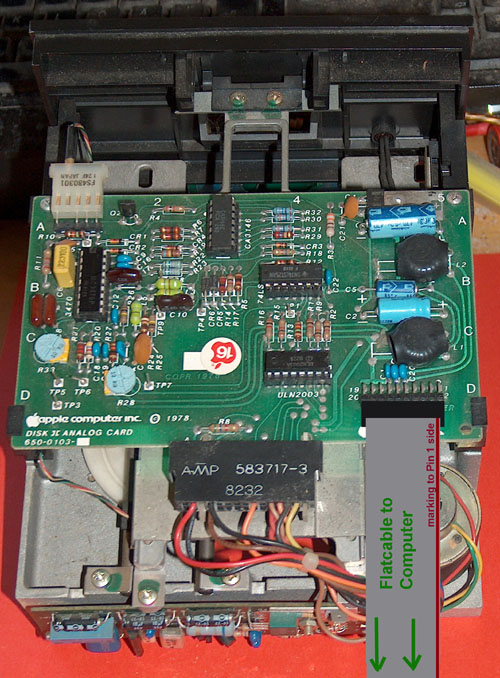
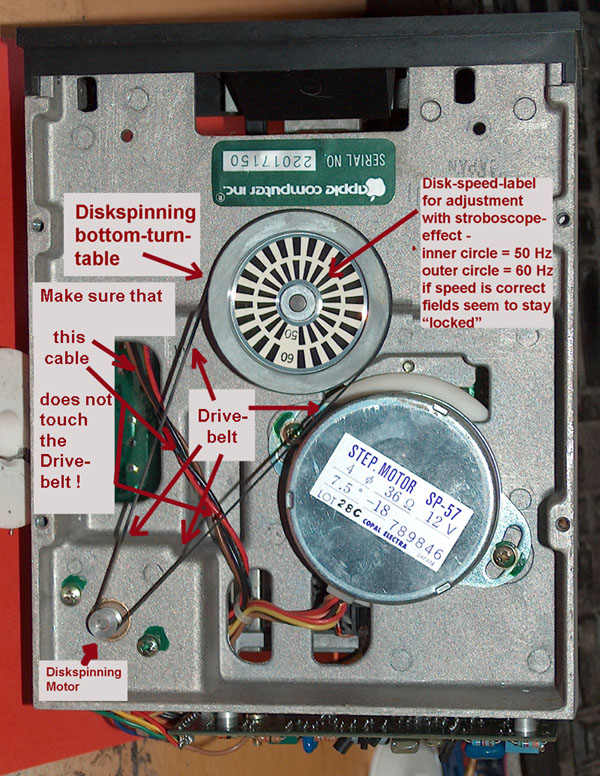
So at the beginning lets just view some pictures to get familiar with the
drive and the related parts of it - after untightening the 4
screws at the
bottom of the drive you can slide off the hood of the drive towards the
backside and after setting the hood and the bottompart besides
you will
see something like this:
Bottomview
of the drive
Topview of the drive
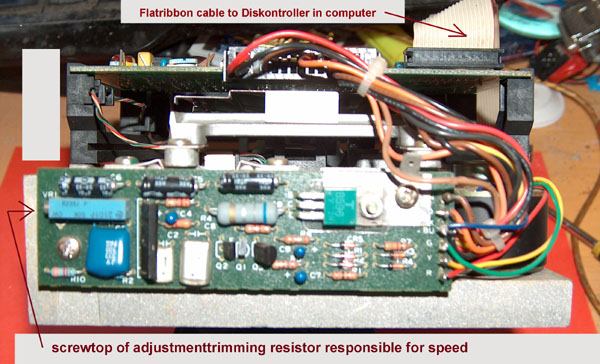
Rearview of the drive
Driveadjustment
without software:
This task can only be performed in
a room with very low light using a lamp
with a simple lightbulb (
no neon - no LED ! Just the very
simple model from Thomas Alvin
Edison ! ). Connect the drive to the controller as drive
1 and insert a formatted disk..
there is no need at the beginning that the disk contains
a system like DOS.....
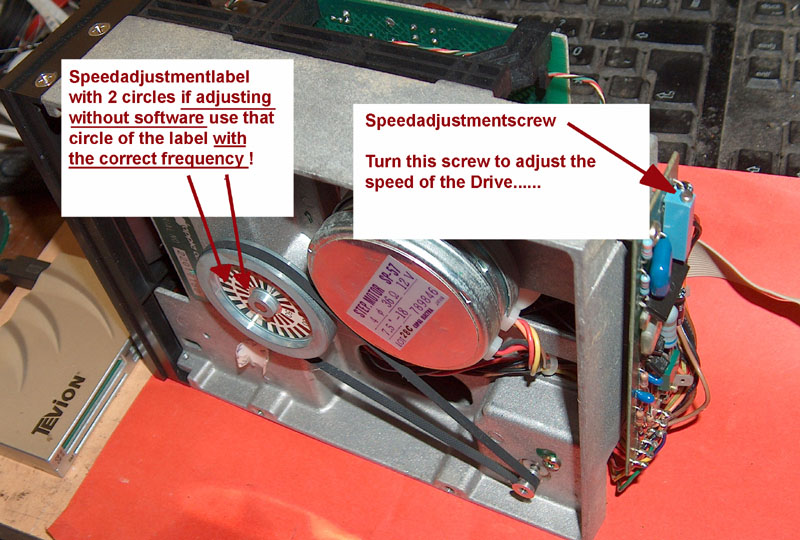
If the drive is set to lay on the side so
the adjustmentscrew shows towards
top and you can view the
bottom then issue the
PR#6 - command and
the drive will start spinning a while before the drive
stops again and the computer issues an error message.
During the time while the disk is
spinning look exactly at a narrow part of
the label and watch that circle of
marks that is corresponding to the frequency used in
your home ( either the ring marked 50 HZ
or the ring marked 60 Hz !
If you try to view exactly you will get the
impression that the marks are
running ahead or backwards...
you must adjust the marks that way
by turning the adjustmentscrew that you get the
impression of the marks "standing still" ( i.e.
neither moving forward nor moving backward ! ). If you
need more time to fix to this point just repeat the
boot-command as given above and
repeat that until you catched the desired point of
"standing marks". If this is completed your drive
will be at least adjusted within a range of +/- 5%. Then
you can try to boot with a good disk.
so if you have to
adjust the speed of the drive without
software the picture at the richt side explains the
recommended position to work with the drive....
added Update: Many thanks
to the member Javstar at
Applefritter ! He granted me some
excellent pictures of the IIc Drive and enabled me by that, to
provide
here additional pictures to show also the related parts of the IIc
drive ....... so here are also the commented pictures of the
related section:
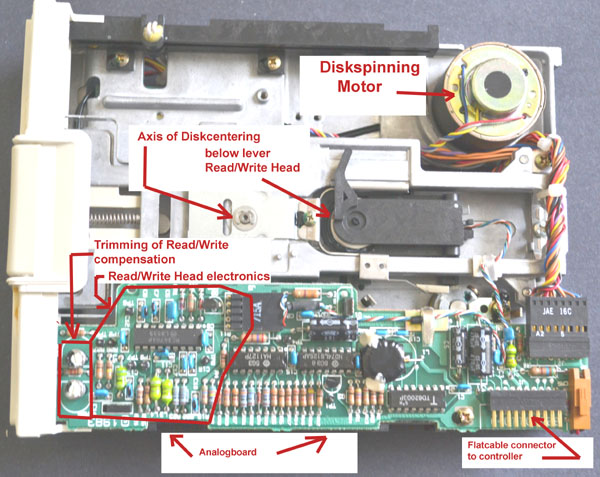
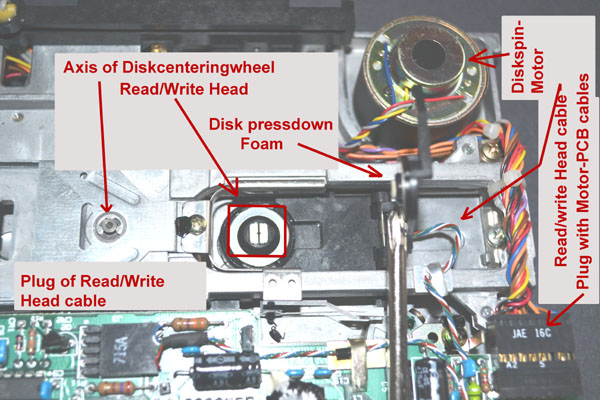
Here is the
Topview of the IIc Drive and below a closeup to the
Read/Write Head
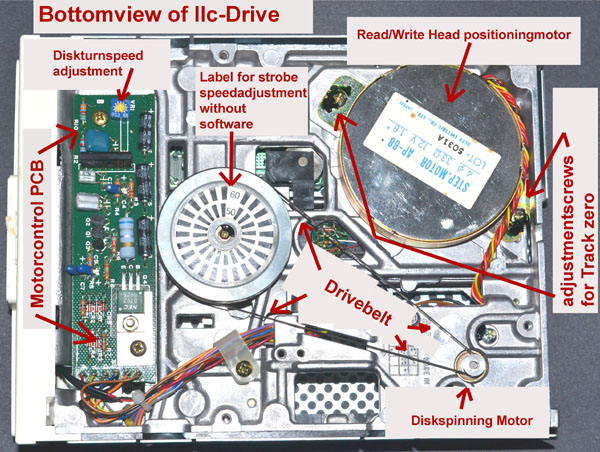
Here is the
Bottomview with the Motorcontrol PCB and the
speedadjustment
Apart from the fact that the order of
the parts have changed / moved - the IIc Drive is
still rather similar in the basic functions and comparable to
the DISK II. So the given
explenations in the text are same valid .... its just a need
to get a bit of orientation
to sort out the components.... the Label at the Diskturntable
can be used for adjustment
the same way as explained above for adjusting the drive
without software -
and the use with software as explained below will also be the
same - the only difference
is the fact that at the DISK II the trimmer is a
spindletrimming and therefor the range will
be several turns - while the trimmer at the IIc is only a
regular variableresistortrim and
therefor the turningrange is reduced to some 270 degrees ...
and therfor of course very
much more sensitive !
and again thanks a lot to
Javstar !
Adjustment
of Drivespeed by monitoring speed with Software
Allthough there are a lot of
softwareprograms out there to adjust the speed of a drive i will
only comment here a selection of the 3 most common ones
and i will leave those from the sharewaremarket aside, due to
the fact that most of them might be neat but in fact most of
them have a poor user-
interface ( just even some of the commercial ones are not really
good ) .... in fact its one thing turning blind a screw to
adjust the speed and another
thing besides with another eye always trying to read a fast
changing display with some changing numbers.....
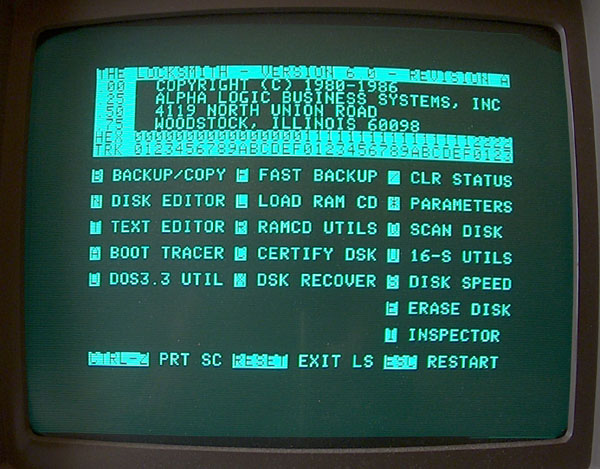
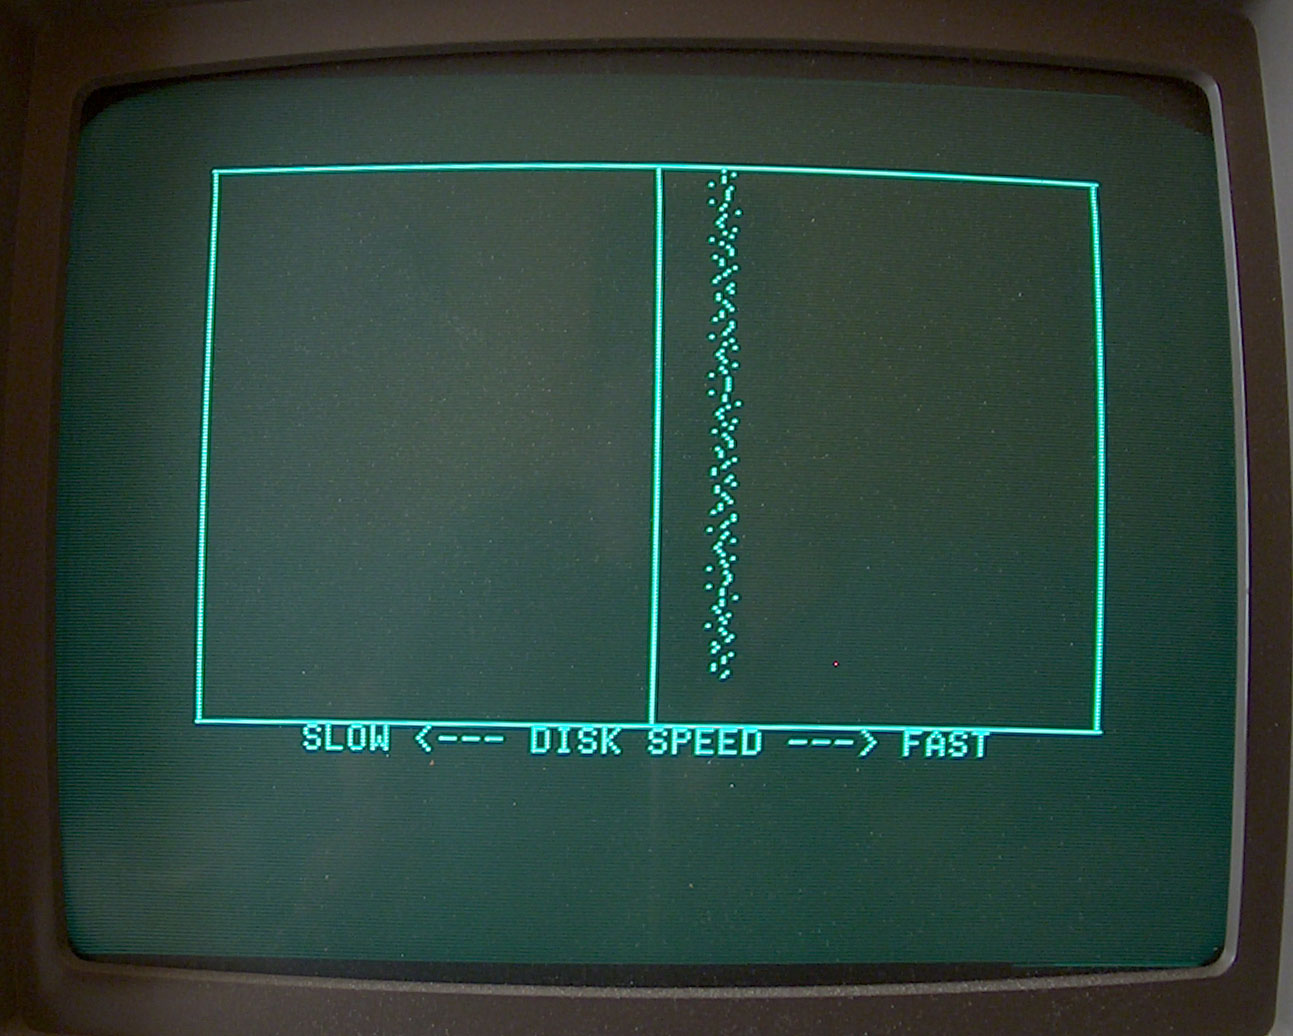
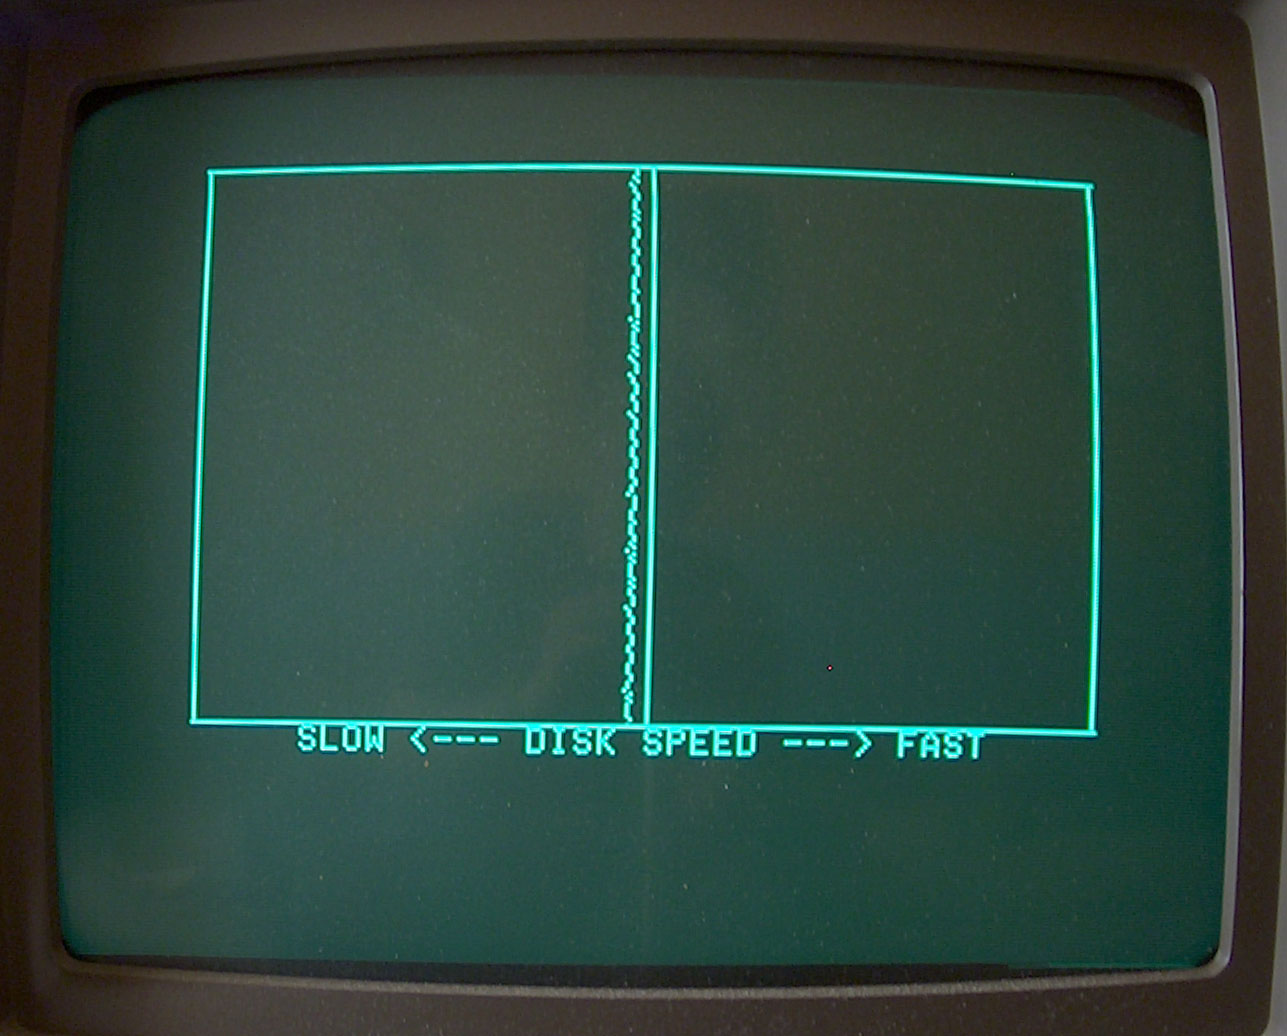
Thats the reason that the Copyprogram Locksmith in the Version
6.0 is still my favorite.... the disply shows a line of dots in
row as a line and you can tune
that line very easy without ruining your eyes or getting
headache and still you will be able to keep one eye really fixed
to the drive and the adjustmentscrew !
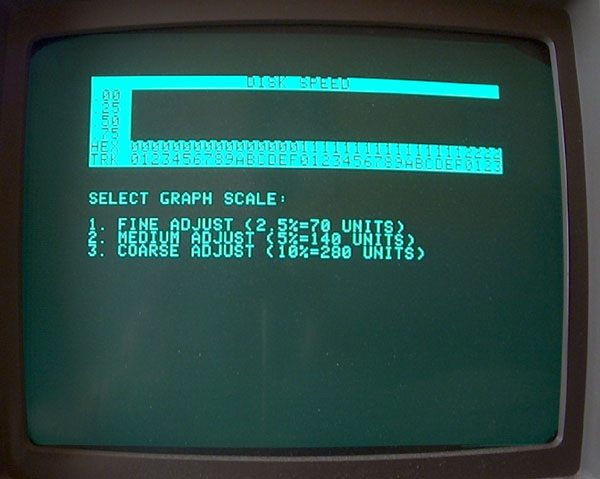
The second big advantage of Locksmith is the fact that you can
choose the scales of operation-mode starting at large scalerange -
tuning the line to the center -
then restart with the middle scale option - tune the line
carefully closer to the middle - and thereafter you can change
the option of measurement to the
smallest range of only +/- 2,5 % and then tune-in the line
nearly to hit the center with just very small drift to the lower
speed side and get some adjustment
somewhere about less that 0,1% slower than perfect ..... that
should be the best to get - if you want the drive to stay in
secure area ( remember what i
explained above about being to fast and taking risk of
overwriting the previous sector ! ) - so you should always keep
very close below the real center to
make sure that even with some slight changes of the speed as
result of temperature or attitude of spinningmotor temperature
you keep to "safe-side".
Speedadjustment with
Copy Plus II Vers. 8.0
Speedadjustment with
Nibbles Away II Vers. A1
Speedadjustment with
Locksmith Vers. 6.0
acceptable...
better...
my
favorite one !
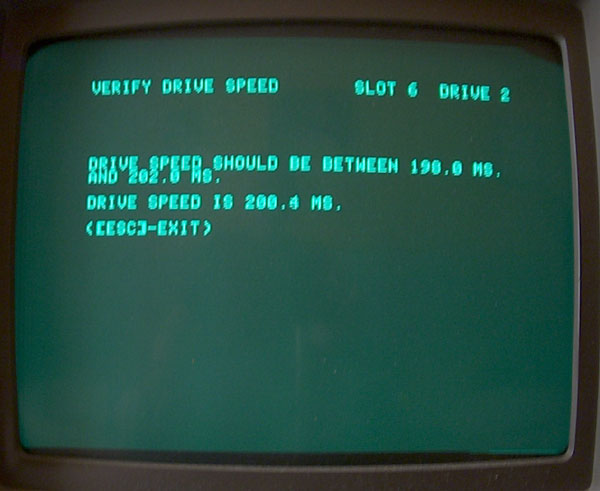
The program Copy II Plus from
Central Point Software is very simple and is chosen from
the menupage with the choice "Verify Drive Speed" -
there after you may choose the drive to be tested -
there a blank disk should be inserted - and striking the
key starts the test. The result is displayed as a
amount measured in milliseconds....
As the display explains you should get the drive within
a range from 198 milliseconds to 202 milliseconds and a
perfect result will be between 199,5
and 199,8 milliseconds.....
this is a view to the testpage and
the amount of milliseconds is flickering while changing
fast.... not very user-friendly.....
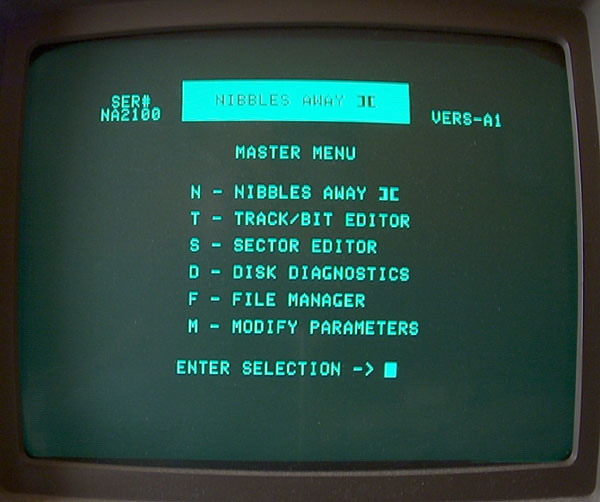
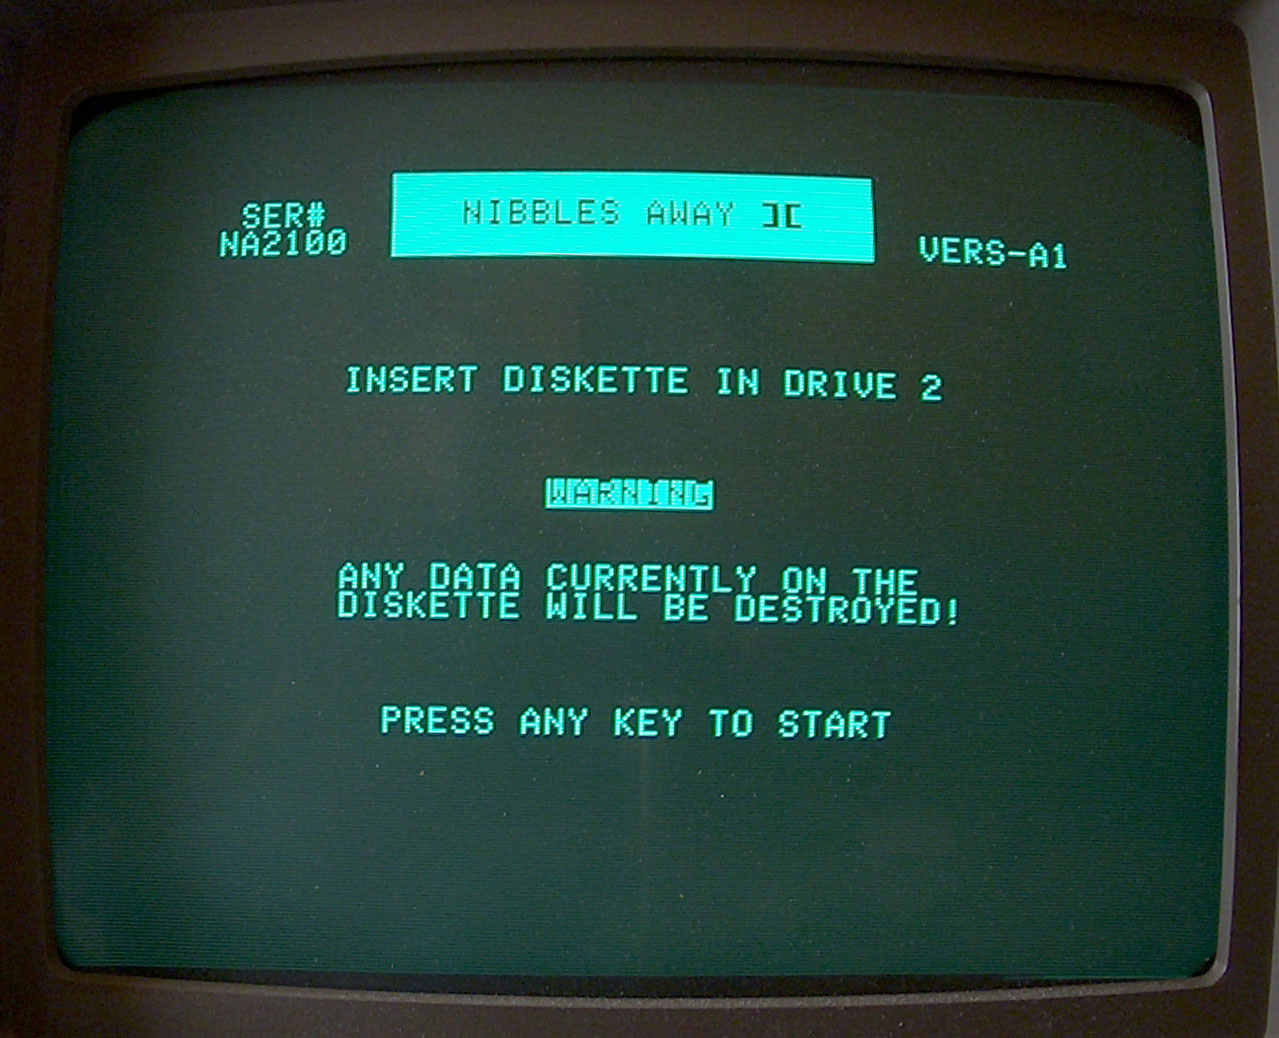
Nibbles Away was in the old days also
a very common copyprogram with a testing option
- you choose DISK DIAGNOSTICS from the menupage.... and
then you choose the drive to be tested - and insert
there a blank disk ....
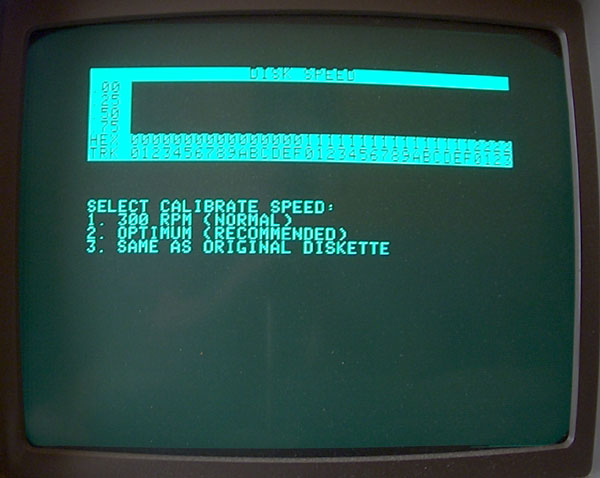
Just
choose DISK SPEED from right side of the menulist and
then choose the drive to be tested either 1 or 2 from
slot 6 controller and the start with large range options
towards the options with smaller range starting with 1
and then switching to the option 2
( donŽt use
option 3 !
Its a special feature to crack a special
copyprotectionsheme ! )
IŽll explain this
later in a special page related to cracking
techniques....
The only
real good thing in this program is one fact: If
you have different drives connected to different
controllers in different slots you may choose any drive
connected to any slot ....
so you can test also
drives not connected to slot 6 !
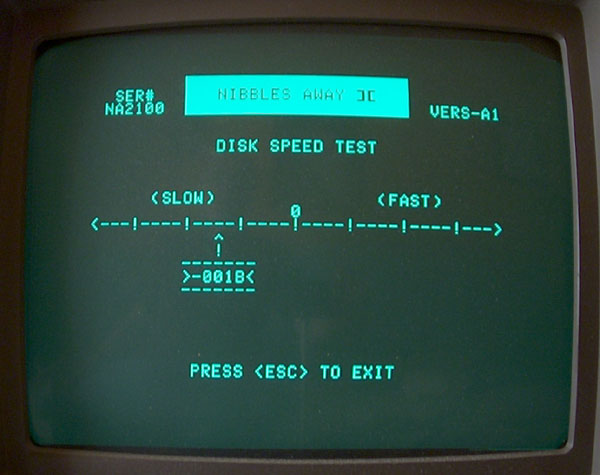
After hitting the key the test
will start and allthough there still is a flickering
display of the
sectornumbers in hex - the big advantage is that at
least there is an arrow moving towards or away from the
center and that is much more user friendly bacause of
the optical display related to the turning of the
adjustmentscrew trying to get the arrow close to - but
slightly below - the center.
The
option 1 is the more general one and its range is larger
... in fact the options are set that way that at Option
1 and selection of the range 1 in that option equals to
option 2 at range 3 so there is a kind of sieve from
Option 1 to range 3, range 2, range 1 and then switching
to option 2 with range 3 advancing to range 2 and then
the very smallest range 1 ! Up to my experience any
working drive will show up at first choice !
( If not - there is some other
more severe trouble there too- like damaged
compensation... )
The big
disadvantage with this program is that there is no
possibility to choose a range-scale
- so if your drive is far out of the range you just know
which side it went off the scale because the
arrow will be tagged to that side -
but turning the screw of the
adjustmentresistor with a
tagged arrow at one side does not give you any idea if
you are running towards back to the scale and the center
or if its still just running more far away !
A
bad drive might show up with something like this if also
the drivebelt is bad because the spread in speed shows
that the motor does not bring its power correct to the
spinningtable ( if belt becomes weak and flexible ) ....
if the drive belt is O.K. the line should be displayed
somehow something like the line in the second display
below.......
As
explained before you start with the COARSE ADJUST and
after pulling the speed by turning the adjustmentscrew
towards to the center and thereafter you may proceed the
the next step
choosing the MEDIUM ADJUST and finally performing the
FINE ADJUST......
If
your display looks somehow similar to this and is close
to the center you may switch to option 2 : OPTIMUM and
then again work ahead from COARSE ADJUST to FINE ADJUST.
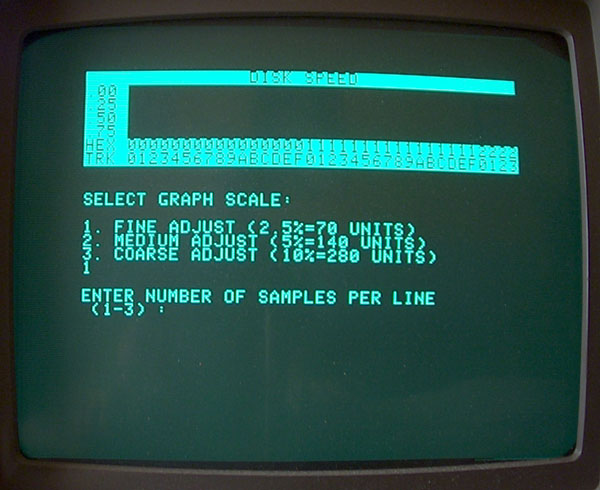
Its
easier to follow up the line if you allways choose the
Option of only taking 1 sample per
line .... taking more
samples only makes sense, when adjusting the
compensation - but not the drive speed !
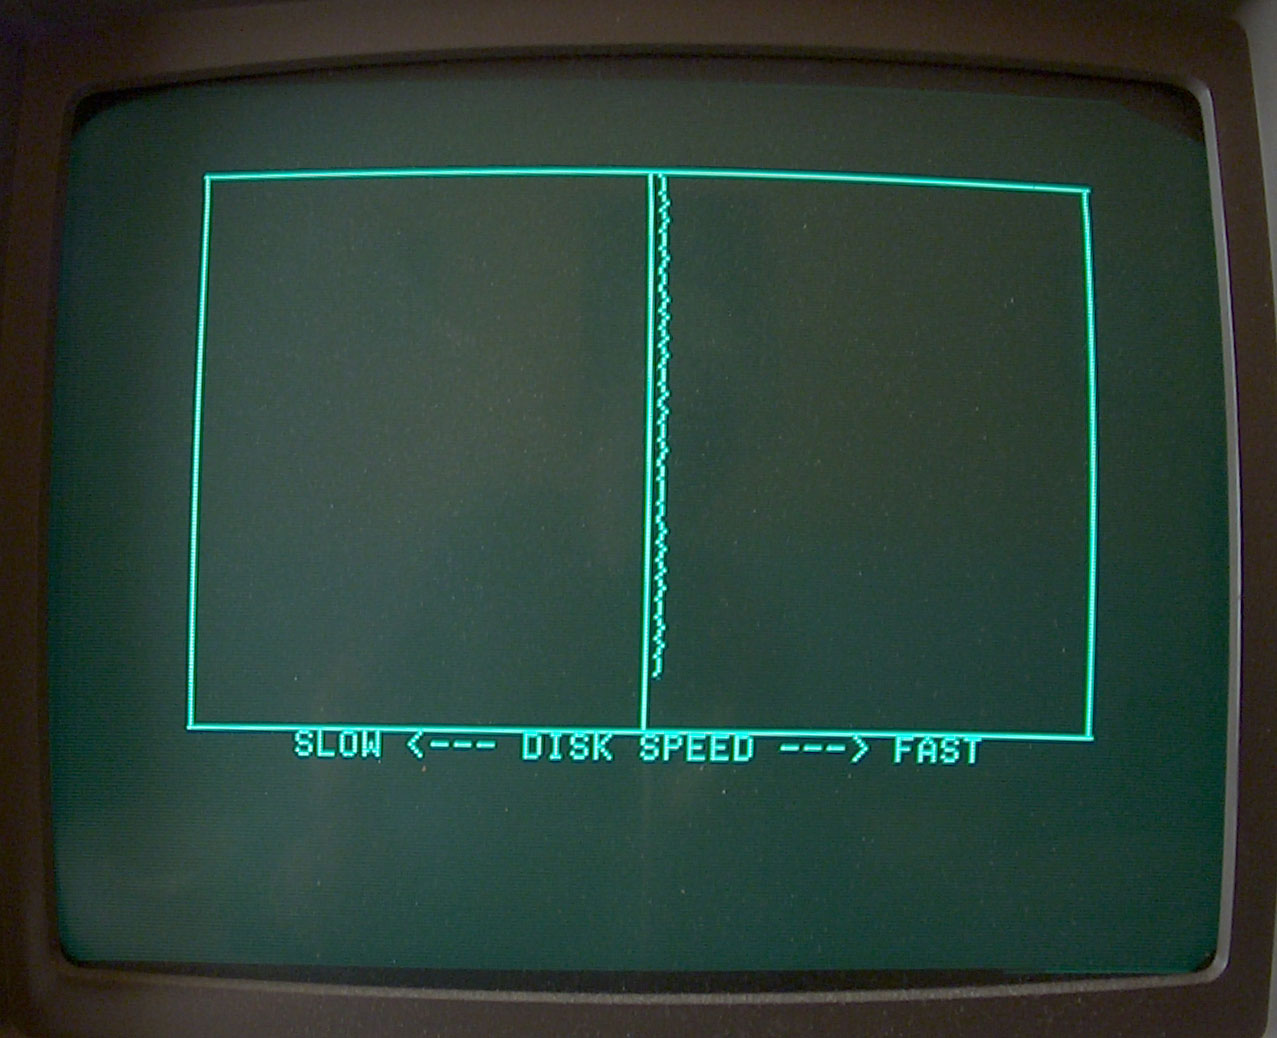
This
displays a perfectly adjusted drive at Option 2
( OPTIMUM ) and FINE ADJUSTMENT with 1 sample per line !
This drive is adjusted to something about 0,1 % slower
than the center. That "slight little bit slower" was
explained above at the section with the diskpictures !