 project page |
APPLEBOX Basics on Keyswitches and Keyboards |
|
|
| Within the last 12 months i have seen
in Applefritter at least half a dozend of threads related to the
topic of keyboard or keyswitches and mistakes with parts of
these components...... so finally i decided to make basic pages
about this topic with the target to provide basical information
on the components themselves and besides also spotting to the
common mistakes that happen with such components........ This Page is related basically to the keyboard components themselves which are related to the so called keyboardmatrix...... Later i will explain more information related to the decoding of the keystrokes i.e. what happens after the keyswitch-part of the PCB and within the decoders before the decoded information is passed over to the CPU and the computer. In this specific contribution i explain the topic by the example of a keyboard from the Apple IIe - but the most information is also valid to the keyboards of the earlier Apple II series like the model II or the II+. The only difference between both series is the fact that at the IIe the keyboardPCB contains only the keyboard-matrix and the decoder is located at the PCB of the mainboard and therefor the cable between keyboardPCB and the mainboard still contains only the lines of the undecoded matrixlines - while at the Apple II- models the decoder is added to the keyboard PCB too and therefor the cable transmits allready decoded Bytes to the mainboard-PCB. So besides of this difference both of the keyboards and the components are nearly identical. Few weeks ago i bought a mainboard of the US-version of the Apple IIe and several days later a keyboard and a case - the powerunit was availiable as sparepart on the shelf. The reason was that i had a RAMworksII card but i could not use it in the european version of the Apple IIe, because the auxiliaryslot is located at these boards at another place and therefor the card wonīt fit in such systems - but i wanted to get a system were i could use that card. By assembling the system i found out that the used keyboard had an issue: the "4"-key and the "z"-key were damaged and "out of order". So i used this occasion to furnish this contribution with additional pictures, Usually when keys are not working in a keyboard there can be two different general issues: single keyswitches with problems within the switches themselves - or problems with the PCB and damaged PCB-lines..... Itīs rather easy to determine between this two kind of issues: If a PCB-line is damaged - then ALL of the keys in that line will fail...... If only single keyswitches within of a line or different lines are out of order - then the damage is surely located within the keyswitch itself ! If the mistake is located within the PCB-lines the remedy is to trace the single lines and check at each switch and soldering the point of the line with a multimeter and making sure that the lines do not become interrupted somewhere within the path - and if the cut / break is located the mistake can be solved by adding with solder some blank wire to "bridge" the interrupted part of the line to make sure, that the connection is restored ! If the problem is not dependent to the PCB but instead to the switches themselves it sometimes helps just to hit that key quite a lot of times ( some 200 hits or more ! ) and probably spray very carefully some contact-spray to the key at the top where the keycapslider enters the keyswitchcabinet. The reason this sometimes solves the problem is the fact that due to age the contacts within the switch might have become corroded with a small film of oxidated metal and the moving of the switch and the contact-spray makes the film get removed "by action" ( i.e. you might say "rubbed off" ).
At the Applefritter community the member
Mike Willegal made one of
the best pages in his own site about the topic first.....
itīs also supplied with excellent pictures and perfect
decription containing some stuff not extra repeated here and
related to the very early Apple keyboards and the datanetics
keyboard in special ....
so itīs a good idea to visit
his page too... |
|||||||||||||||||
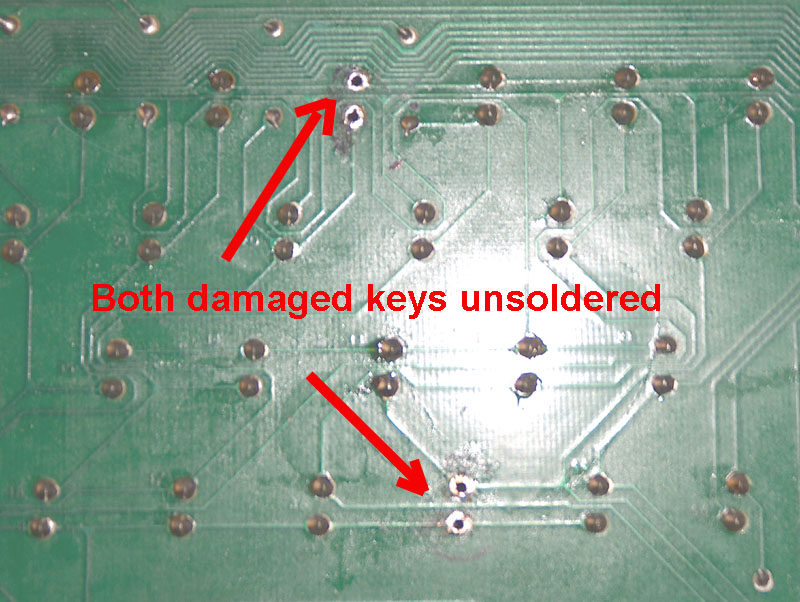
| Unsoldering the keyswitch you must make sure that there is no contact at all between the PCB and the switch ! | |||||||||||||||||
|
|||||||||||||||||
|
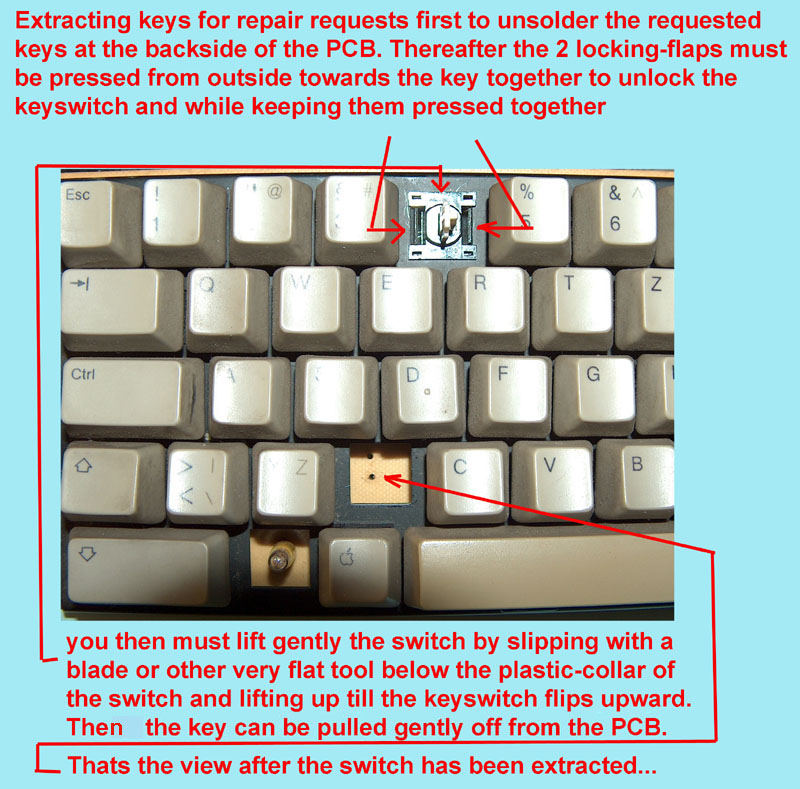
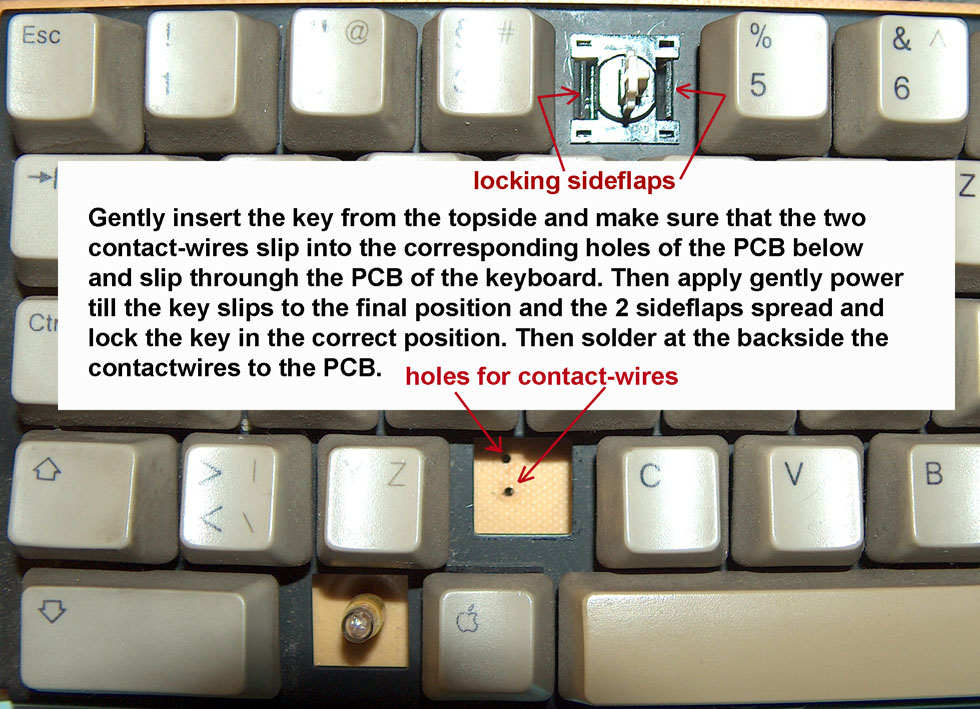
Regardless of the type of keyswitch used in the specific keyboard these switches are fixed in the steelframecarrier with some kind of locking-flaps. So before removing the keyswitch the first point will be to find out what kind of locking-flaps are used and how to get them in the position that they will remain in the position "released". In the example below the flaps are at both sides and must be pressed together to get the flaps in the "released" position. I did it by using a fitting tweezer - but as alternate solution you could for example also just push the flap at one side towards the center and then insert a toothpick to keep the flap in the correct position and thereafter push the flap at the other side too with a small screwdriver towards the center and insert there a toothpick too.... therafter you can take a long nose plier and gently pull out the keyswitch from the keyboard. |
|||||||||||||||||
|
|||||||||||||||||
|
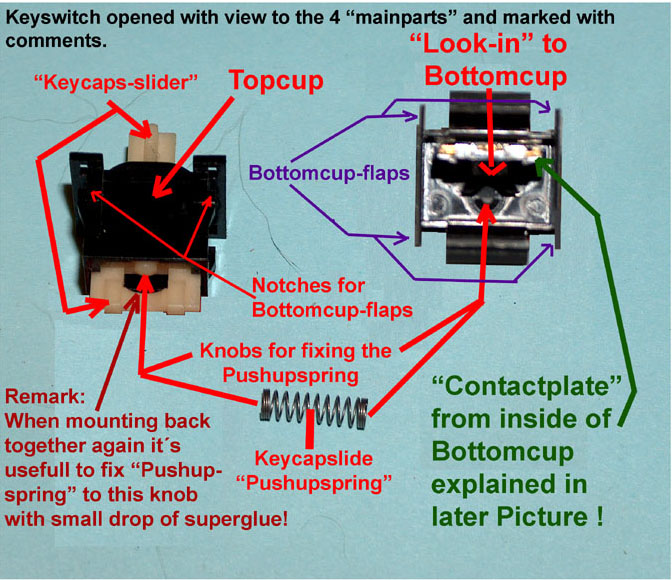
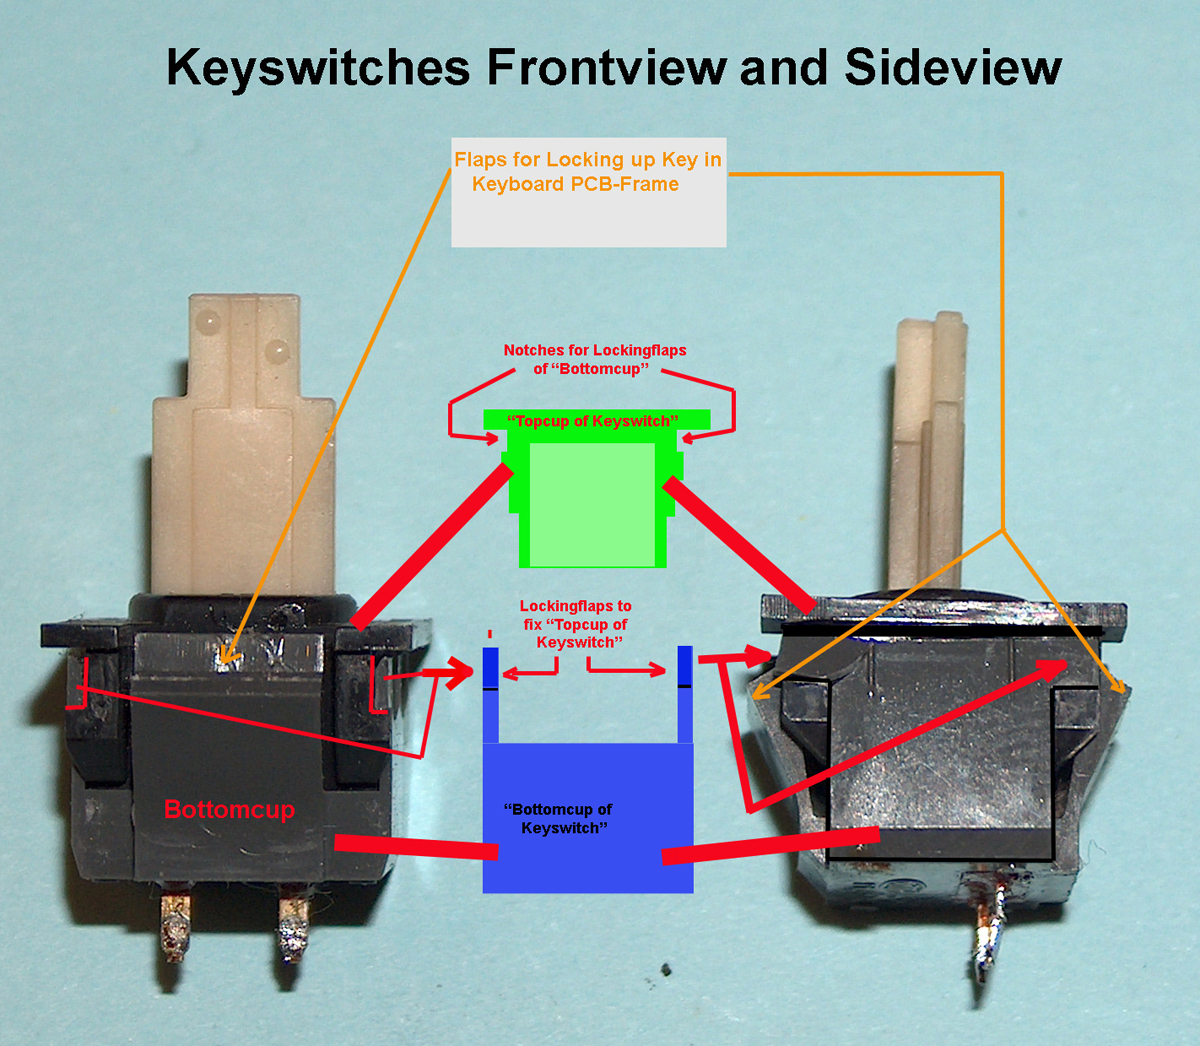
The next picture shows the two extracted keyswitches and i also added a basic sheme of the keyswitch-housing. Of course each kind of keyswitch might slightly differ from eachother but basicaly you will always find a case made of two parts - iīll call them in the following the topcup and the bottomcup. They will be stuck in eachother and there will be some kind of "locking-system" to fix both parts together. With careful inspection you should be able to find out how to open the keyswitch. But be very careful before realy opening the case - in nearly all cases there is a spring inside to keep the keycap-slider in the upward position and bringing up that slider again after pushing the key down ! And that spring is just waiting to escape ! So its wise to open a case only in an area where you will be able to discover that spring - if it jumped away in the moment the case has been opened. When opening the case do that very slowly and carefully to see the inside at the very moment when first sight inside is possible - it will be important to recognize position of the components inside - the way they are located - and the correct position ! You will need this later when you want to get the switch built together again ! The place were you extract the switch should have excellent lighting condition and you should have a magnifying-glass in reach to examine details of the inside of the case of the switch - having a carefull look to notches in the plastic that keep the components in the correct place. Try to recognize how the "pushup-spring" ( the one that wanted to "escape from rungistan" ) is locked in correct position . Recognize in later pictures how the spring was fixed in this switch as example what to look for. |
|||||||||||||||||
 |
|||||||||||||||||
|
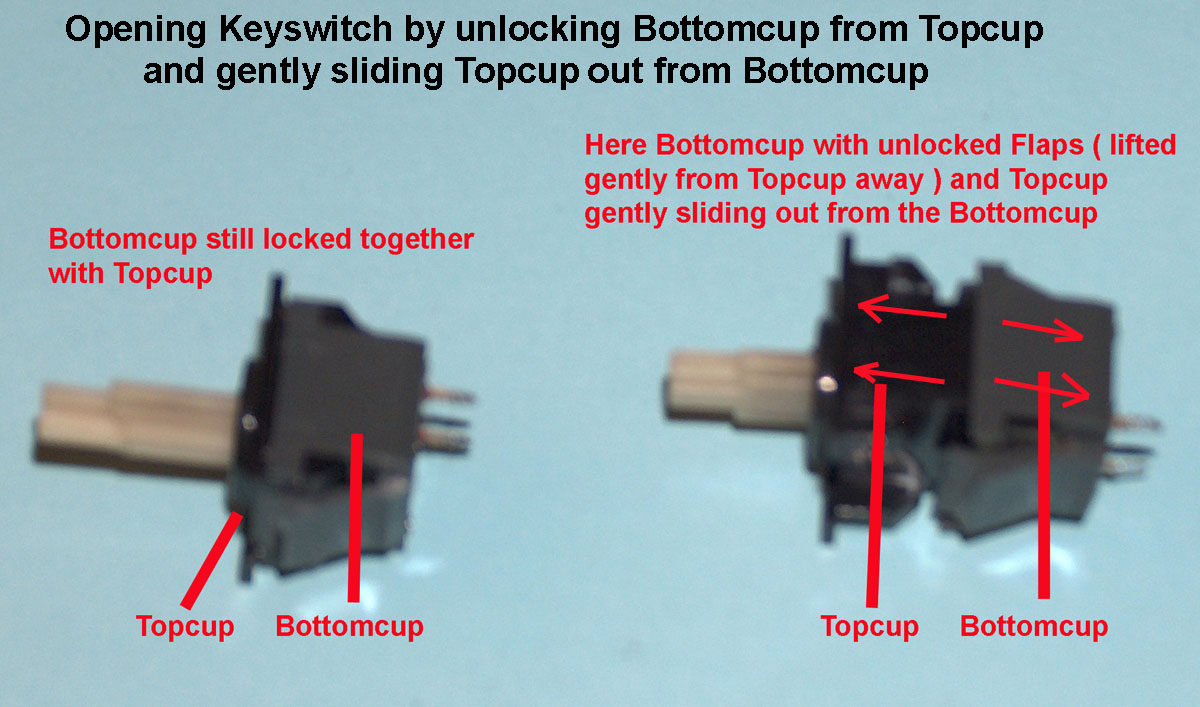
The next picture shows the preparation and the stage just when lifting off the bottomcup from the topcup. |
|||||||||||||||||
 |
|||||||||||||||||
|
The next picture shows the parts after they have been extracted from eachother and the view of the parts visible then.... |
|||||||||||||||||
|
|||||||||||||||||
|
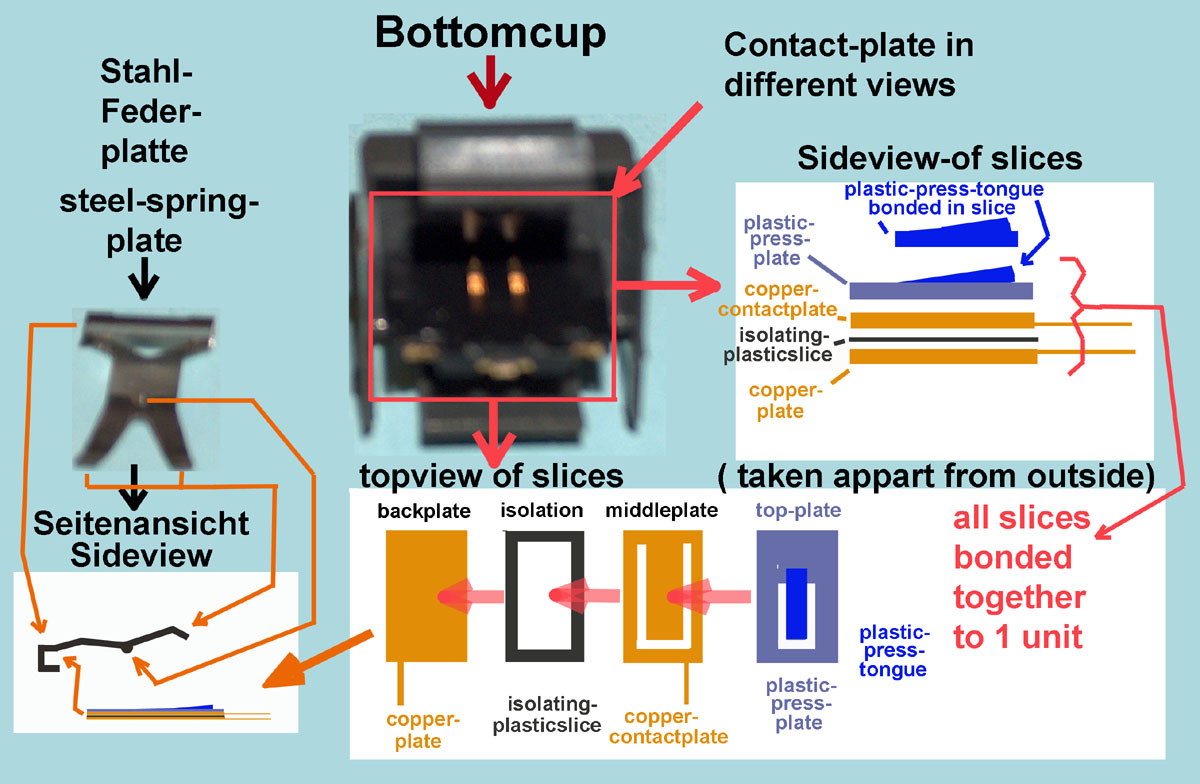
The next picture shows in detail the so called "active" part of the switch, which is responsible for closing the contacts when key is pushed down. The view in the bottomcup shows the look at the contactplate and you can recognize the plastic-tongue that causes the two levels of copper to get in contact if it is pressed down and in partial detail you can recognize the level of the copper. The details in the drawings explain how the different levels of the contactplate are bonded together and the other drawing shows the metalspringplate from the sideview. This steelspringplate is fixed together with the contactplate by just beeing clasped on it. The form shall just make sure that when the keycapsslider is pressed down the springplate applies power to the plastic-press-tongue and that forces the coppercontactplate towards the copperplate and makes the shortcut between the two copperlevels and wires leading outside of the switch from the contactplate. |
|||||||||||||||||
 |
|||||||||||||||||
|
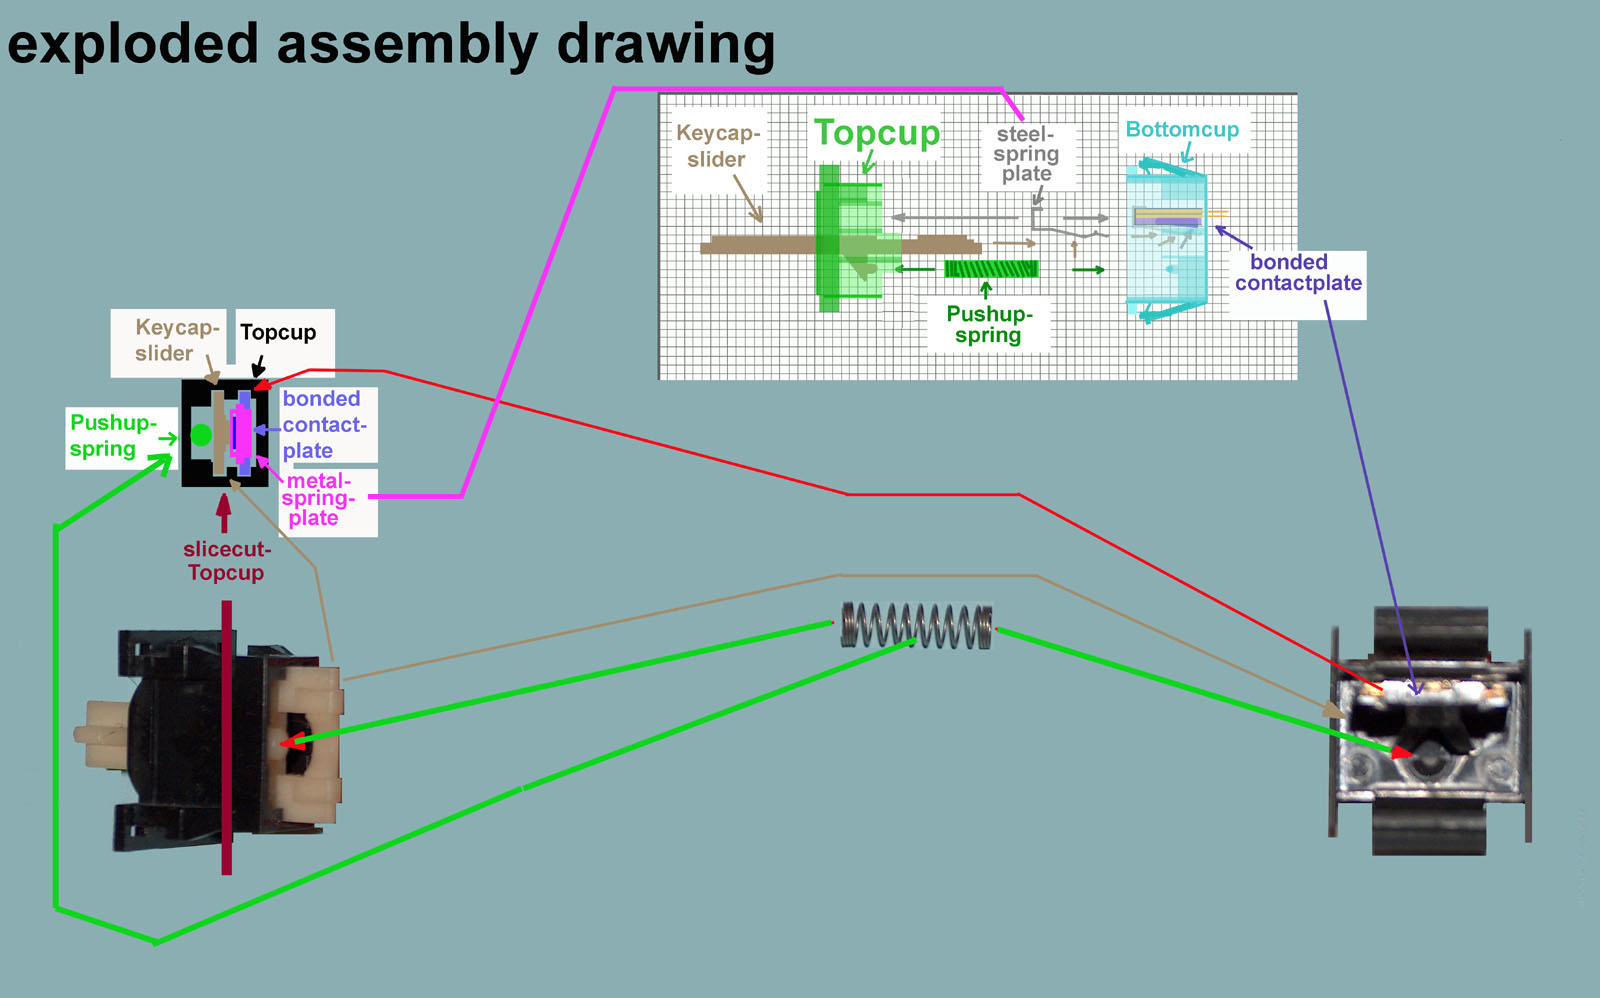
Taking another view to the steelspringplate above there are two remarkable points: the kind of knob in the steel that applies the pressure to the contactplate and the right side of that plate where the key-caps-slider applies power to the knob in the middle. So if that right part is bent up some 5 to 10 degrees more, the power applied to the knob and to the plastic-press-tongue of the contactboard will be raised and therefor the chance for the switch to work again can be raised too...... another way to reach that goal would be to fix a very tiny and thin piece of plastic at the plastic-press-tongue - but you must ensure that the force is only applied to the plastic-press- tongue and nowhere else ! The next picture explains some details to take care of, when attempting to assemble the switch back together again ..... |
|||||||||||||||||
 |
|||||||||||||||||
|
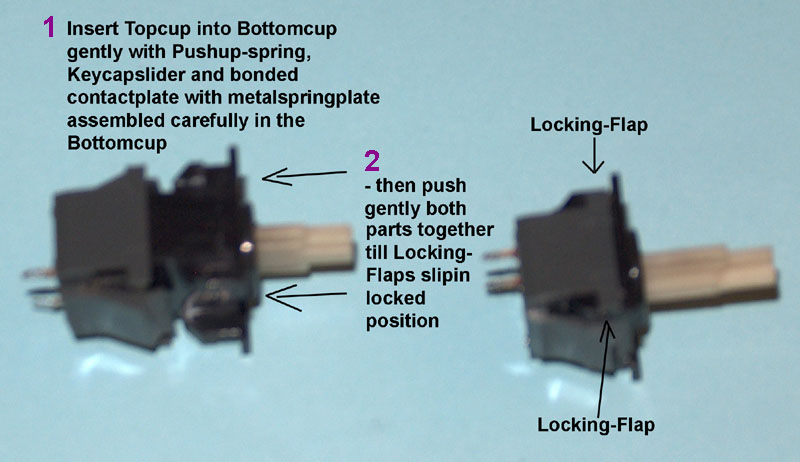
then weīre back again at the point - when the pushup-spring is fixed with a very small drop of superglue as explained in the earlier picture and the contactplate is very gently guided to slide into the reserved notches of the topcup and slowly and gently slipping / pushing the two cups ( topcup and bottomcup ) together untill the locking-flaps from the bottomcup snatch into the notches of the topcup. |
|||||||||||||||||
|
|||||||||||||||||
|
Then the switches are tested with the multimeter to decide if the repair was succesfull and the keyswitches may be used again or if a replacement is needed. In very urgent cases - when no spare keyswitch is availiable there might also be a chance - if only one key must be replaced.... to think about the possibility to exchange a needed key ( like a-key or y-key or enter-key with one key that is only very rare used ( like the closed apple-key ). |
|||||||||||||||||
|
|||||||||||||||||
|
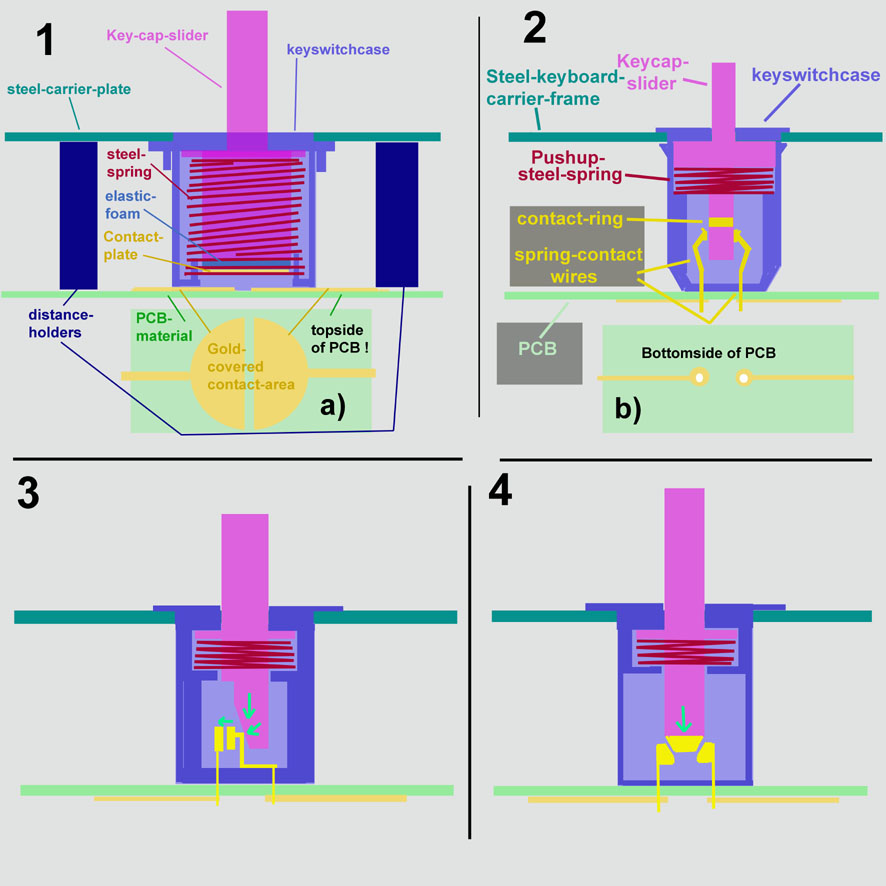
The following schematics show different kinds of keyswitches that i have seen throughout the last 30 years. The typ displayed at no.1 is a typ used in very old apple IIīs. Not long time ago corey986 at AF had such a keyboard for repair and resurection and he made an excellent contribution about this type of keyboard. The common mistake of this type of keyswitch are two points: the flexible-foam is tired and does not press the contactplate plain to the contactpads or if the contactpads at the PCB or in the switch are dirty or corroded. In some cases itīs needed to replace the flexible-foam ( of course not thicker than the original part ) or replacing the contactplate with a metalwasher. In other cases itīs just done by cleaning the contactpads. The bad news : Keyboards with such keyswitches are realy tricky when they must be re-assembled ! The most common trick used in that case is the adjusting of the PCB again with toothpicks before inserting the screws and fastening them in crossing order ( one corner - opposite corner - corner 90 degree angle - opposite corner - points in the middle between this screws - again crossing over untill all screws are tightened. A very careful point is the correct fixing of the steel-stiffening-reels at the backside of the PCB. This type of keyboard is easy to be identified due to the fact that where the switches are located no solderingpads are availiable ! The contactside is the UPPER-side towards to the switches ! The type explained at no.2 is also common with old style Apple-keyboards. With those keys the most tricky thing is to open the cases. then after the top with the keycaps-slider and the pushup-spring is removed the keyswitch might be repaired by pressing gently the two contact-wires together..... this makes sure that after the re-asembly the two contactplates slide firmly along the key-caps-slider and makes sure connection to the contact-ring. The same treatment can be applied in similar way at the key no. 4. At the contacts of the switch displayed at no.3 the one that slides along the key-caps-slider can be bent in that way that the pressure to the key-caps-slider and the outer contactplate is enhanced. The other possible solution with this type of switch is to apply with glue very careful some thin plastic to the key-caps-slider to ensure the pressure applied to the contactplate or to bend the outer contactplate gently towards to the inner contactplate. |
|||||||||||||||||
|
|||||||||||||||||
| |||||||||||||||||
