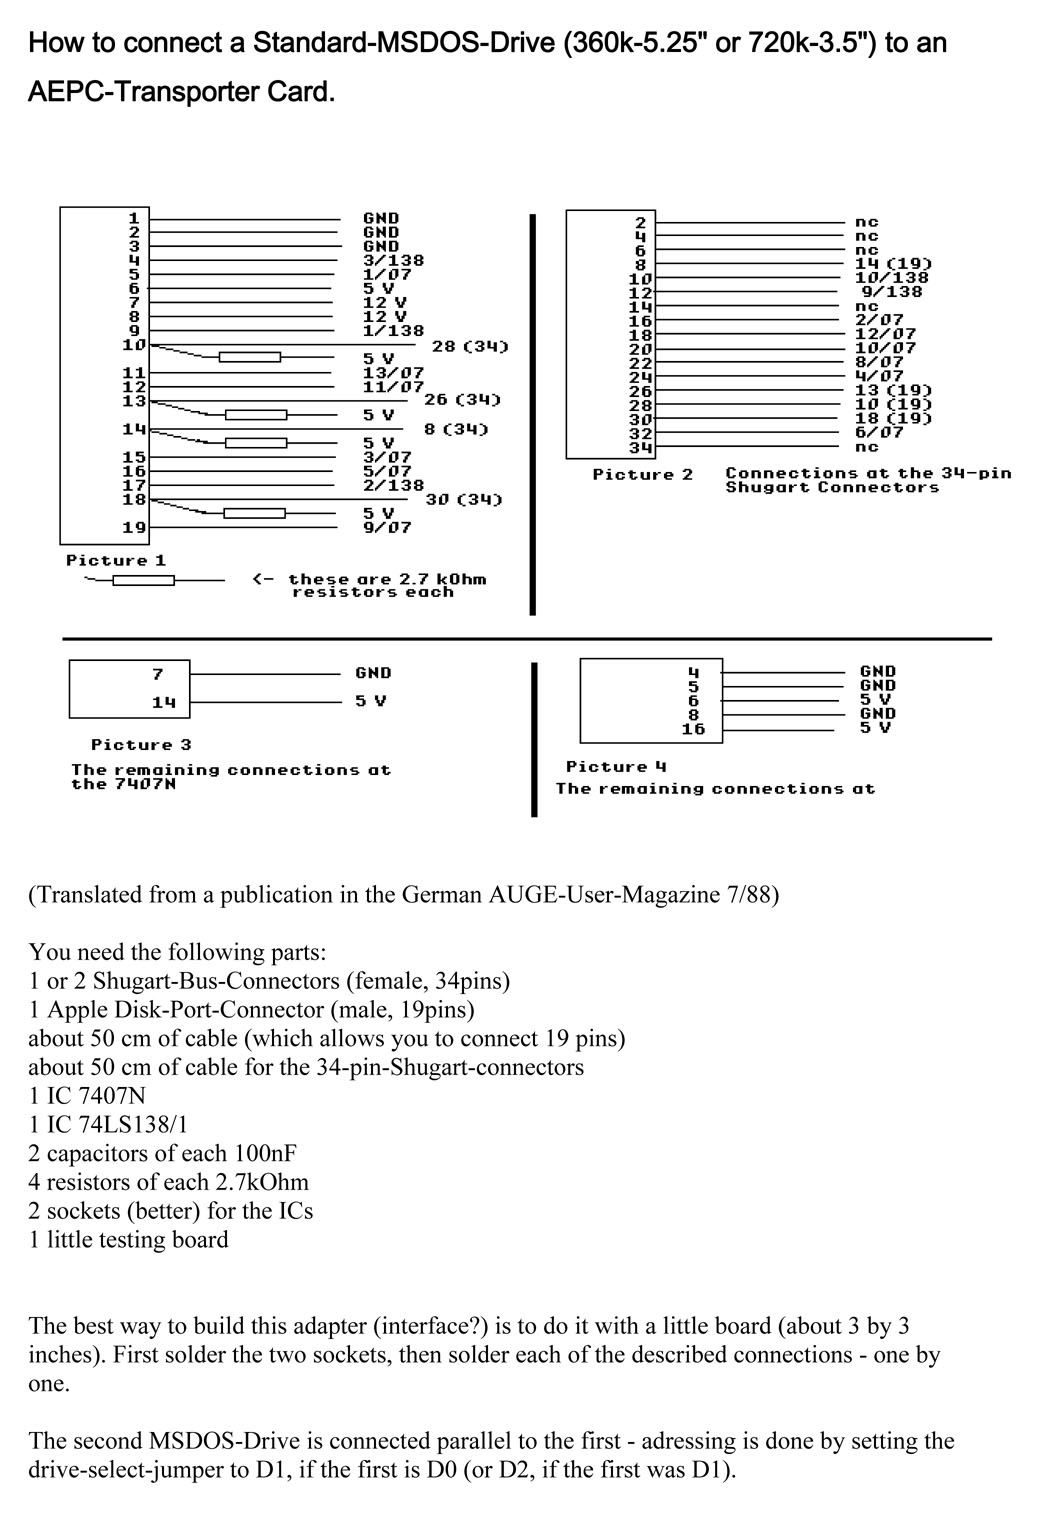
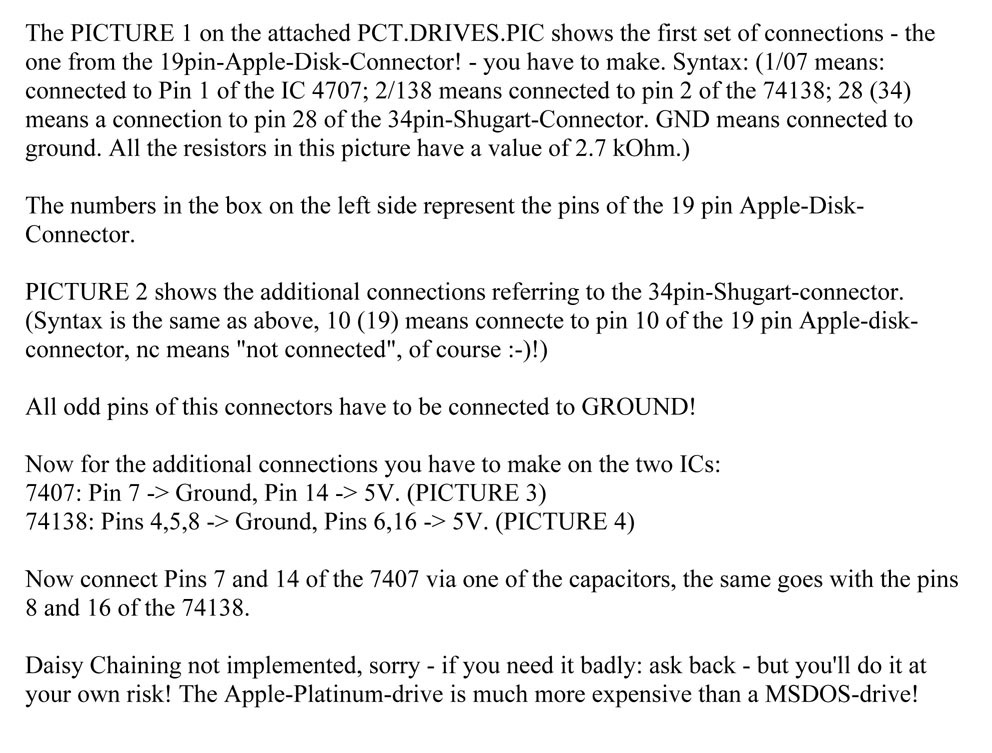
 |
APPLEBOX
Making a substitute for
the AE PC Transporter "Transdrive" Adaptor to connect MS-DOS drives to the PC-Transportercard |
| In 2012 i purchased a PC-Transportervard from
Applied Engineering. Unfortunately i had no chance to also buy an so
called "Transdrive" from Applied Engineering too - allthough such a
drive is required to operate the PC-Transporter card. Without such drive
itīs not really possible to activate the PC-Transporter card, because
you canīt boot MS-DOS from an Apple diskdrive. So after the card was tested by only using the card internal function menu - the further usage was set apart waiting for either the chance to get in touch with an original "Transdrive" from Applied Engineering or if that requires too much time by making a substitute adaptor.
In the meantime i decided to make a homebrew
Adaptor as substiture for the use with a regular PC-Floppy drive
replacing the "Transdrive". I remembered that in the mid 80īs in the
German User magazine from AUGE ( Apple User Group Europe ) a page had
been published with a description how to connect a MS-DOS floppydrive to
the PC-Transporter. In the mid of 2013 i started scanning the USER
MAGAZIN from AUGE to get them in digital format ready for my archive.
When i scanned the Issue that contained that mentioned page - i splitted
the copy of that page apart and saved a copy to my "pending projects"
directory. |
||
 |
||
 |
||
Now in september i picked up that page and started with the task. First of all i decided that i didnīt want to wire up that with simple experimantal board, but instead i wanted to use a real PCB instead. At the other hand after i had transferred the plan into my PCB- design software i had to realize that eith normal use the PCB would require at least a double sided PCB - but i wanted to avoir at the one hand the delay of 14 days caused by sending the gerber files to a PCB-manufacturer and waiting for shipment of the finished PCBs and at the other hand such a task would have cost at least 100 to 150 Euro - even for such a tiny board. Then while changing the design - to reduce the wirebridges requested - if i would reduce the PCB to a single sided layer - i also thought about the possinility of making two boards - one for pulling "straight through" a 20 pin flatribbon cable from PS-Transporter Card to the adaptor - or as alternate version - another PCB with a fixed 19-pin DB19 shell connector which would permit to use a "straight through" 19-wire cable with DB-19 connector at both sides prepared for mounting in fixed position in a case with 2 MS-DOS drives. So after long weekend the results turned out like the following 2 Adaptors - here first the adaptor for the flatribbonbcable solution: |
||
 |
||
 |
||
| In the population picture above the requsted wirebridges are drawn in red color. | ||
 |
||
| then a picture after dilling the holes: | ||
 |
||
| Next i populated / soldered the wirebridges and the sockets: | ||
 |
||
| Then i completed the PCBs with th ICs, Connectors and cables: | ||
 |
||
| In case somebody still wants to use zthis PCB with a DB-19 connector in a case - it is upmoct important to realize that itīs not possible to use regular "pressing connectors, but instead the cable must be wired by hand at the 19-pin DB-19 connector like the following shema displays: | ||
 |
||
| And here now id the second solution with the DB-19 shell connector integrated for fixed mounting in a case: | ||
 |
||
| Also in this case the wirebridges have been added to the population drawing in red color. This version requires quite a lot more wire bridges than the other version. | ||
|
|
||
| After drilling the PCB should look alike this following picture: | ||
|
|
||
| And again that PCB after the wirebridges and socket have been added / soldered: | ||
|
|
||
| And here a picture of the completed PCB with the distancebolts ready for fixed mounting in a case: | ||
 |
||
Unfortunatly both of the previous Adaptors have the lack of not being very flexible. Version 1 permit the connection of the MS-SOS drives but not offering the loopthrough which would permit to "daisy-chain" the normal IIGS drives behind the MS-DOS drives as explained in the manual of the "Transdrive" because there is no Output Floppyport to the IIGS drives. The second version would permit to "daisy chain" the IIGS drives, but it can only be connected by the 20pin flatribbon cable to the to the "internal" Diskport connector of the PC transportercard.
Therefor i decided to make a third final
version, combining both previous versions to one larger version.... this
will be used in an |
||
 |
||
 |
||
 |
||
 |
||
 |
||
| After the PCB has been completed i went to the
storage of my spareparts and found an old baseplate of a former external
floppystation. It still contained the additional powersupply for 2 5,25 floppy drives. Not beeing sure if there will be enough space left i removed that powersupply and set it apart besides for later use. Then i took a saw and remaved partialy the metalplate from the rear side to add the new backplate with the "īTransdrive" substitute. The baseplate then looked like this: |
||
Frontview of the modified baseplate: |
||
Sideview of the modified baseplate:  |
||
and here the rearview to the modified baseplate:
|
||
Then after adding the 2 floppydrives the baseplate looked like this: |
||
| to be continued, when hooked up to the PC-Transporter card.... | ||


