|
||||||||||||||||||||||||||||||||||||||||||||||||||||||||||||||||||||||||||||||||||||||||||||||||||||||||||||||||||||||||||||||||||||||||||||||||||||||||||||||||||||||||||
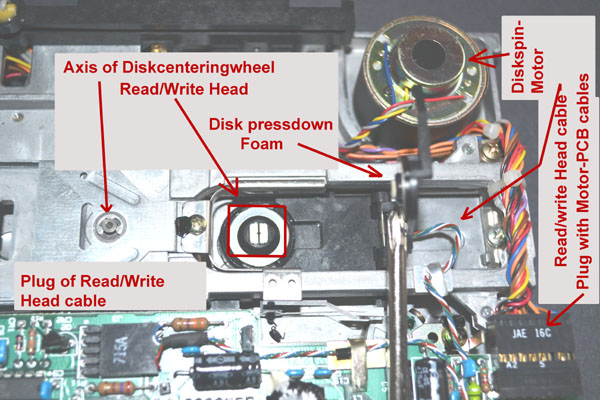
| Speedadjustment, Trackalignment, Cleaning and Service project | ||||||||||||||||||||||||||||||||||||||||||||||||||||||||||||||||||||||||||||||||||||||||||||||||||||||||||||||||||||||||||||||||||||||||||||||||||||||||||||||||||||||||||
|
The DISK][ Drive - a classic storage system Important Warning ! Never dismount or open drives unless they have been disconnected from the computer ( i.e. unplugging the drive from the diskcontroller ) and are without power ! Disobeying may leed to a damaged computer or damaged drive ! Only in very few tasks power will be needed and this will be mentioned within the text at the correct place pointing to the needed precautions! |
||||||||||||||||||||||||||||||||||||||||||||||||||||||||||||||||||||||||||||||||||||||||||||||||||||||||||||||||||||||||||||||||||||||||||||||||||||||||||||||||||||||||||
|
||||||||||||||||||||||||||||||||||||||||||||||||||||||||||||||||||||||||||||||||||||||||||||||||||||||||||||||||||||||||||||||||||||||||||||||||||||||||||||||||||||||||||
|
due to european laws
and german court decision: I hereby declare no responsibility to any "deep links" resulting from the links in this page. I have no influence to the pages linked hereby in this page and the contents in those pages. I therefor can't take any kind of responsibility to contents in the pages, where these links direct the readers browser to nor to the contents resulting from following up links from those pages. The reference to contents by this links is dependent ro the status of the date when the links have been set ( April 2013 ) and it might occur that references and contents may change by the fact that domains may have been discontinued from their former owners. In such cases i can't take any kind of responsibility to the changed contents. this is specialy valid to banners, advertisements or merchandising links in the targeted pages.
|